giant.camera_models.pinhole_model
This module provides a subclass of CameraModel that implements the distortion free Pinhole camera model.
Theory
Recall the experiment that you can use to observe a solar eclipse without damaging your eyes. You take a piece of paper, place a small hole in it, and hold it some distance above another sheet of paper. The sun is then projected onto the lower piece of paper showing how much is currently obscured by the moon. The sun on the paper appears much smaller than the sun in the world because the distance between the two sheets of paper is much smaller than the distance between the top sheet of paper and the sun. This is an example of a Pinhole camera, which assumes similar triangles to relate points in the 3D world. This is demonstrated in the following diagram.
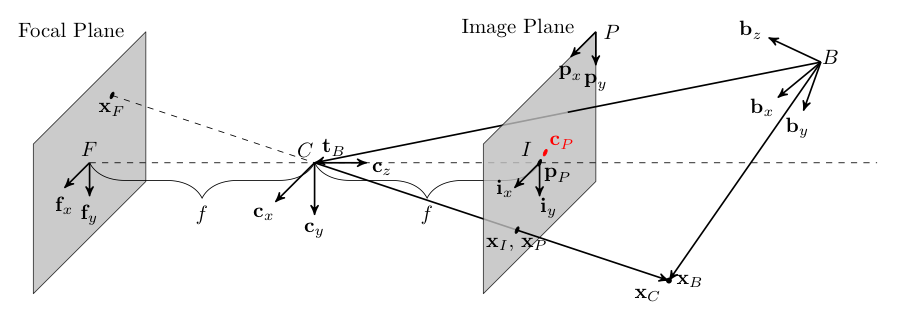
The pinhole camera model describes a gnomic projection from 3 space to 2 space.
In the above figure, point \(\mathbf{x}_B\) is rotated and translated to be expressed in the camera frame as point \(\mathbf{x}_C\) and this is then projected through the pinhole camera model to point \(\mathbf{x}_P\) in the image. Mathematically this is given as
where \(f\) is the focal length of the camera (the distance between the 2 sheets of paper in our example), \(a_{1-3}\) are polynomial coefficients for a temperature dependence on focal length (the camera dimensions may change due to thermal expansion), \(T\) is the temperature the projection is occurring at, \(k_x\) and \(k_y\) are one over the pixel pitch values in units of pixels/distance in the \(x\) and \(y\) directions respectively (cameras are not continuous but have discrete receptors for light to enter), and \(p_x\) and \(p_y\) are the location of the principal point of the camera in the image expressed in units of pixels (typically at the center of the pixel array).
Speeding up the camera model
One of the most common functions of the camera model is to relate pixels in a camera to unit vectors in the 3D camera frame. This is done extensively throughout GIANT, particularly when ray tracing. Unfortunately, this transformation is iterative (there isn’t an analytic solution), which can make things a little slow, particularly when you need to do the transformation for many pixel locations.
In order to speed up this transformation we can precompute it for each pixel in an detector and for a range of
temperatures specified by a user and then use bilinear interpolation to compute the location of future pixel/temperature
combinations we need. While this is an approximation, it saves significant time rather than going through the full
iterative transformation, and based on testing, it is accurate to a few thousandths of a pixel, which is more than
sufficient for nearly every use case. The PinholeModel and its subclasses make precomputing the
transformation, and using the precomputed transformation, as easy as calling prepare_interp()
once. Future calls to any method that then needs the transformation from pixels to gnomic locations (on the way to
unit vectors) will then use the precomputed transformation unless specifically requested otherwise. In addition,
once the prepare_interp() method has been called, if the resulting camera object is then saved to
a file either using the camera_model
save()/load() functions or another
serialization method like pickle/dill, then the precomputed transformation will also be saved and loaded so that it
truly only needs to be computed once.
Since precomputing the transformation can take a somewhat long time, it is not always smart to do so. Typically if you have a camera model that you will be using again and again (as is typical in most operations and analysis cases) then you should precompute the transformation and save the resulting camera object to a file that is then used for future work. This is usually best done at the end of a calibration script (for a real camera) or in a stand-alone script that defines the camera, precomputes the transformation, and then saves it off for a synthetic camera for analysis. If you are just doing a quick analysis and don’t need the camera model repeatedly or for any heavy duty ray tracing then it is recommended that you not precompute the transformation.
Whether you precompute the transformation or not, the use of the camera model should appear unchanged beyond computation time.
Use
This is a concrete implementation of a CameraModel, therefore to use this class you simply need to initialize
it with the proper values. Typically these values come from either the physical dimensions of the camera, or from
a camera calibration routine performed to refine the values using observed data (see the calibration sub-package
for details). For instance, say we have a camera which has an effective focal length of 10 mm, a pix pitch of 2.2 um,
and a detector size of 1024x1024. We could then create a model for this camera as
>>> from giant.camera_models import PinholeModel
>>> model = PinholeModel(focal_length=10, kx=1/2.2e-3, ky=1/2.2e-3,
...                      n_rows=1024, n_cols=1024, px=(1024-1)/2, py=(1024-1)/2)
Note that we did not set the field of view, but it is automatically computed for us based off of the prescribed camera model.
>>> model.field_of_view
9.050999753955251
In addition, we can now use our model to project points
>>> model.project_onto_image([0, 0, 1])
array([511.5, 511.5])
or to determine the unit vector through a pixel
>>> model.pixels_to_unit([[0, 500], [0, 100]])
array([[-0.11113154, -0.00251969],
       [-0.11113154, -0.090161  ],
       [ 0.98757256,  0.99592402]])
Classes
This class provides an implementation of the pinhole camera model for projecting 3d points onto images. |